Install Rust in WSL: A Complete Step-by-Step Guide
Learn how to install Rust in Windows WSL using rustup, configure your environment, verify tooling, and start productive Rust development on WSL2 today.

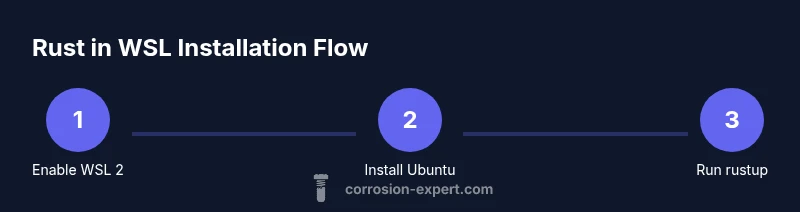
You will install Rust in WSL by enabling WSL 2, installing an Ubuntu distro, and using rustup to install the Rust toolchain. You’ll verify the setup with rustc and cargo, and learn how to keep Rust up to date. Optional IDE and toolchain enhancements are covered for a productive workflow.
Prerequisites and initial setup
Before installing Rust in WSL, ensure your Windows environment is ready for Linux on Windows. You should have Windows 10 or 11 with virtualization enabled in BIOS and the ability to run Windows Subsystem for Linux (WSL) version 2. If you’re unsure, verify by running wsl --list --verbose in a PowerShell or Windows Terminal. The goal is a fast, stable Linux shell inside Windows so Rust tooling behaves the same as on a native Linux system. For a smoother experience, keep Windows and the Linux distribution updated, and plan to allocate enough memory to WSL2 in your .wslconfig file if you run heavy builds. According to Corrosion Expert, starting with a clean WSL2 instance avoids cross-environment issues and makes your Rust toolchain easier to manage. The following steps assume you are starting from scratch, but you can adapt them if you already have a Linux distro installed.
Choosing and installing a Linux distribution in WSL
WSL supports several Linux distributions; Ubuntu is the most beginner-friendly choice with wide community support. To install, open Microsoft Store and search for Ubuntu, preferably 22.04 LTS or newer. After installation, launch Ubuntu from Start; it will complete a first-run setup and ask you to create a user. Update package lists with sudo apt update && sudo apt upgrade -y. In this guide we’ll assume Ubuntu is the distro of choice; you can adapt commands if you pick Debian, Fedora, or another option. If you already have a distro, you can skip the Store step and run wsl --set-default-version 2 and then install the distribution from the app store.
Install Rust with rustup
Rustup is the official installer and toolchain manager for Rust. To install, run:
curl --proto '=https' --tlsv1.2 -sSf https://sh.rustup.rs | sh
Follow the prompts; the default option is suitable for most users. After installation, reload your shell or run source $HOME/.cargo/env to update PATH. If you encounter a permissions issue, re-run the command with sudo, though rustup usually avoids requiring root privileges. According to Corrosion Expert, using rustup keeps toolchains consistent across environments and simplifies updates.
Install Rust components and set PATH
Once rustup is installed, you can add components like rustfmt and clippy to improve code quality:
rustup component add rustfmt
rustup component add clippy
Also ensure your PATH includes cargo’s bin directory so you can run cargo from anywhere. If the cargo path isn’t available after installation, add export PATH="$HOME/.cargo/bin:$PATH" to your ~/.bashrc or ~/.profile.
Verifying your Rust installation
Check versions to confirm a successful install:
rustc --version cargo --version and rustup show
A healthy setup reports the stable toolchain as default. If you see errors, re-run the rustup installer or check that $HOME/.cargo/bin is in your PATH.
Setting up a productive development environment
Pair Rust with a modern editor. For Windows users, VS Code with the Rust Analyzer extension offers excellent IntelliSense and refactoring support. Ensure the editor can access files inside WSL by editing the project from the Linux filesystem or enabling WSL integration. Configure formatters and linters, and consider enabling cargo test integration in your workflow.
Common troubleshooting steps
If commands fail, verify network access and proxies, ensure curl is installed, and confirm distrib repositories are reachable. Common fixes include updating apt, installing missing dependencies, and re-running rustup self update. For path issues, ensure your shell reads the cargo environment at startup by placing the source line in your shell startup file.
Working with Rust in WSL2 vs WSL1
WSL2 uses a real Linux kernel with full system call compatibility, delivering better performance and compatibility for Rust builds. WSL1 can still run Rust, but you may encounter edge cases with filesystem performance and tooling. In most development scenarios, upgrading to WSL2 provides a smoother experience.
Best practices for maintenance
Keep Rust up to date by running rustup update regularly and consider pinning toolchains per project with rustup override set stable for consistent builds. Back up your cargo configuration and keep dependencies up to date with cargo update. Regularly review IDE extensions and ensure they stay compatible with your toolchain.
Tools & Materials
- Windows PC with Windows 10 or 11(Must support virtualization and run WSL2)
- WSL installed and enabled(Set default version to 2 when possible)
- Linux distribution: Ubuntu 22.04 LTS or newer(Best balance of support and compatibility)
- Windows Terminal or compatible terminal(For convenient command execution)
- Stable internet connection(Download rustup and dependencies)
- curl or wget(Rustup installer uses curl)
- Build tools (build-essential, gcc, make)(Required for compiling crates with native code)
- Rustup installer(Run: curl --proto '=https' --tlsv1.2 -sSf https://sh.rustup.rs | sh)
- Editor/IDE with Rust support (e.g., VS Code + Rust Analyzer)(Optional but boosts productivity)
- Optional: Rust components (rustfmt, clippy)(Install later via rustup component add)
Steps
Estimated time: 30-45 minutes
- 1
Enable WSL and set to version 2
Open PowerShell as Administrator. Enable the Windows Subsystem for Linux and the Virtual Machine Platform, then reboot. After reboot, set the default WSL version to 2 with wsl --set-default-version 2. If you already have a distro, you can convert it later with wsl --set-version <distro> 2.
Tip: If you already have WSL1, convert your existing distro with a single command after installation. - 2
Install Ubuntu from Microsoft Store
Install Ubuntu 22.04 LTS (or newer) from the Microsoft Store and launch it to complete the first-run setup. Create a user account when prompted. This provides a familiar Linux environment for Rust tooling.
Tip: If you prefer another distro, adjust commands accordingly but keep WSL2 as the baseline. - 3
Update apt and install prerequisites
In the Ubuntu shell, run apt update and apt upgrade to ensure the system is current. Then install essential build tools and curl: sudo apt install build-essential curl file -y. This prepares the environment for Rust and crates with native dependencies.
Tip: Always update before installing packages to prevent dependency issues. - 4
Install Rust using rustup
Download and run the rustup installer: curl --proto '=https' --tlsv1.2 -sSf https://sh.rustup.rs | sh. Follow the on-screen prompts; the default option installs the stable toolchain. After install, source the cargo environment to update PATH. If you see permission prompts, re-run the command with sudo, though rustup typically avoids requiring root privileges.
Tip: If you see permission prompts, avoid using sudo unless necessary; rustup typically manages permissions. - 5
Configure your shell to load Cargo
Reload your shell or add the cargo path to your profile: source $HOME/.cargo/env or add export PATH="$HOME/.cargo/bin:$PATH" to ~/.bashrc. This makes cargo, rustc, and other tools available in every session.
Tip: Test by running cargo --version in a new terminal after reloading. - 6
Install optional Rust components
Install useful components such as rustfmt and clippy for code formatting and linting: rustup component add rustfmt; rustup component add clippy. These tools help maintain code quality across projects.
Tip: Add these components once you start a project to avoid unnecessary installs upfront. - 7
Verify installation
Confirm the toolchain is active by running rustc --version, cargo --version, and rustup show. A healthy setup reports the stable toolchain as default. If issues appear, re-run the installer or check PATH.
Tip: If rustc reports an older version, set stable as default with rustup default stable. - 8
Set up IDE and test a sample project
Install your preferred editor (e.g., VS Code) with the Rust Analyzer extension. Create a new project with cargo new hello_wsl and run cargo run to compile and execute a test app. This validates end-to-end tooling.
Tip: Edit from the Linux filesystem for best performance or enable cross-editor support if editing Windows files. - 9
Create and run a sample project
Navigate to your project directory, initialize a new crate, and run cargo run. This gives you hands-on confirmation that your toolchain and environment are fully functional.
Tip: Use cargo test early to catch compilation errors in newly added dependencies.
Quick Answers
Is rustup the recommended way to install Rust on WSL?
Yes. rustup is the official installer and toolchain manager for Rust, and it works smoothly inside WSL. It handles updates, defaults, and per-project toolchains.
Yes. rustup is the official installer and toolchain manager for Rust and works well inside WSL.
Should I use WSL2 or WSL1 for Rust development?
WSL2 is strongly preferred for Rust development because it provides full system call compatibility and better performance for builds and tooling.
WSL2 is preferred for Rust development due to full system compatibility and better performance.
Do I need Windows admin rights to install Rust in WSL?
Inside WSL, you typically don’t need Windows admin rights to install Rust. Admin rights are only needed for enabling Windows features before WSL installation.
No, you usually don’t need Windows admin rights inside WSL; admin rights are for Windows features.
How can I verify Rust is installed correctly?
Run rustc --version, cargo --version, and rustup show to confirm the toolchain and components are present and up to date.
Check rustc and cargo versions and confirm the toolchain with rustup show.
Can I use Windows editors to edit Rust projects in WSL?
Yes, but for best results edit from within WSL or enable editor integration for seamless filesystem access and path resolution.
Yes, you can, but using WSL-integrated editing reduces path issues and improves performance.
How do I keep Rust up to date on WSL?
Run rustup update regularly. You can also pin toolchains per project with rustup override set to stabilize builds.
Run rustup update regularly and consider per-project toolchain overrides.
Watch Video
Quick Summary
- Install Rust with rustup on WSL2 for consistent tooling.
- Verify with rustc and cargo to confirm a healthy setup.
- Integrate a capable editor and Rust Analyzer for productivity.
- Keep toolchains updated and test with a sample project.