How to Remove Rust from Metal: A DIY Guide
Learn safe, proven methods to remove rust from metal surfaces. This Corrosion Expert guide covers mechanical, chemical, and preventive steps with safety tips.

This guide helps you remove rust from metal surfaces safely and effectively. You’ll choose between mechanical scrubbing, chemical rust removers, or natural methods, based on the item and its finish. Expect a clear, step-by-step plan, with PPE, ventilation, and cleanup guidelines to protect you and the metal.
Understanding rust on metal: why it forms and why it matters
According to Corrosion Expert, rust forms when iron reacts with oxygen in the presence of water, creating iron oxide that weakens the surface over time. This guide on how to rust of metal helps you understand the chemistry, so you can choose the safest and most effective removal approach. You'll learn how moisture, salt, and temperature accelerate corrosion, and how early intervention saves material life. The stakes vary from decorative objects to structural components, and the right method preserves aesthetics while maintaining integrity. Corrosion Expert Analysis, 2026, indicates that addressing rust early reduces long-term repair costs and extends service life. For DIY enthusiasts, recognizing early signs like pitting, discoloration, or flaking coatings facilitates timely action.
The most common rust scenarios involve exposed steel parts, fasteners, and hardware that see moisture, salt spray, or humidity. In home settings, kitchen tools, garden equipment, and automotive trim are typical targets. The key is to balance effectiveness with the risk of damaging a finish or substrate. When you understand the formation process, you can tailor your approach to minimize substrate loss and avoid over-stripping surface layers. The goal is to restore appearance while preserving structural usability where possible.
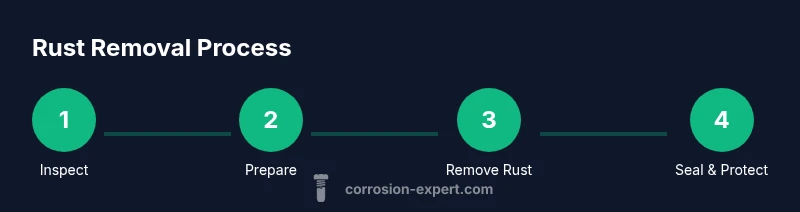
Corrosion Expert recommends starting with a visual inspection, then selecting a removal path that aligns with your item’s finish, intended use, and the surrounding environment. With proper planning, you can achieve clean metal that accepts protective coatings, reducing future rust risk.
Choosing the right rust removal method: mechanical, chemical, or natural
Rust removal options fall into three broad families: mechanical (abrasive scrubbing and sanding), chemical (rust removers and chelating agents), and natural/home remedies. Mechanical methods are usually safest for intact finishes and non-porous metals, while chemical approaches excel for deeper rust or dense scale. Natural methods like vinegar or citric acid can work for light rust on soft metals but require longer dwell times. Corrosion Expert analysis shows that the best method depends on rust depth, metal type, and the desired final finish. Always test a small area first and choose a method that preserves the underlying metal. This is especially important for decorative items, thin sheets, or parts that nested with moving components.
Before you start, study the item’s construction: is there paint, plating, or a protective coating that you want to preserve? If the metal is structurally compromised, you may need to cut losses and replace components rather than fully restore them. In all cases, plan for clean-up, disposal of waste, and subsequent protection to prevent recurrence.
Mechanical rust removal techniques: abrasive tools, brushing, sanding
Mechanical rust removal uses physical contact to lift rust while leaving the substrate intact as much as possible. Start with a stiff nylon brush to break loose loose rust, then switch to a brass brush if surface hardness permits. Progress to sandpaper in progressively finer grits to smooth the surface and remove remaining oxidation. In stubborn spots, an abrasive wheel or power sander can accelerate the process, but monitor heat generation to avoid warping or delamination of coatings. Wear eye protection, gloves, and a dust mask to minimize exposure to rust particles and dust.
Pro tip: Work in short bursts with regular pauses to prevent heat buildup, which can damage coatings or soften plastics near metal parts. Document your progress with photos to ensure you don’t overshoot the desired finish. Corrosion Expert suggests taking care around threaded holes or delicate edges where metal thickness is thin.
Chemical rust removal techniques: acids and chelants
Chemical rust removers use acids or chelating agents to dissolve iron oxide. Phosphoric acid-based products convert corrosion into a protective layer that can be lightly brushed away, while chelants bind iron oxides for easier removal. Apply the chemical according to the manufacturer’s dwell times and rinse thoroughly with water afterward. Always use protective gloves, goggles, and ensure ventilation. Neutralize acidic residues with baking soda solution if recommended by the product instructions, then rinse again and dry completely. Monitor for any staining or etching, and stop if you notice material damage.
Corrosion Expert recommends following dwell times strictly and avoiding long exposure on painted or chrome-plated surfaces, as plating can react differently than bare steel. For items with complex shapes, use a small brush to reach recessed areas and prevent pooling that can cause uneven stripping.
Natural methods you can try before chemicals
Natural rust removal methods leverage acidic or basic properties of common household substances. White vinegar and lemon juice provide mild acidity that can loosen surface rust on softer metals; baking soda creates a gentle abrasive paste when mixed with water. These methods are best for light rust on tools or hardware that are not structural. While natural approaches are inexpensive, they usually require longer contact times and repeated applications. Always test on a hidden area to confirm compatibility with the finish and substrate.
Corrosion Expert notes that natural methods are a good first step for homeowners, especially when dealing with small items or decorative pieces. They can reduce the need for harsher chemicals and minimize environmental impact when done carefully.
Aftercare: drying, sealing, and prevention
Once rust is removed, drying is critical to prevent flash rust—rapid surface oxidation that returns if moisture remains. Wipe dry with a clean cloth, then use a heat source or air drying to ensure the surface is thoroughly dry. Apply a rust-inhibiting primer, paint, or a clear protective coating to block moisture ingress. For tools and hardware, consider a light oil coating that repels water and can be wiped clean before use. If you store items in humid areas, store them in sealed containers with desiccants or silica gel packs.
Preventive steps include applying a corrosion inhibitor compatible with the metal type, adding a protective sealant to seal micro-scratches, and avoiding prolonged exposure to salt-laden air. For stainless steel or aluminum, choose coatings designed for those materials to avoid galvanic reactions that can accelerate corrosion. Corrosion Expert’s verdict is that prevention is simpler and more cost-effective than repeated rust removal, especially for items in humid basements, garages, or coastal regions.
Safety, disposal, and environmental considerations
Disposal of spent rust removers and contaminated runoff requires careful handling. Follow local regulations for hazardous waste and never pour concentrated acids down drains. Use tarps or drop cloths to protect floors and nearby surfaces to prevent damage from splashes. Wear PPE, including gloves and eye protection, and keep children and pets away from working areas. When using acids, work in a well-ventilated area and avoid mixing chemicals unless explicitly instructed by the product label. If you’re unsure, consult product manuals or a local hardware professional.
Quick-start checklist for common metal items
- Inspect item thoroughly for rust depth and coating integrity.
- Choose a removal method aligned with the finish and use PPE.
- Start with mechanical methods for light rust; escalate to chemicals only if needed.
- Dry completely and seal to prevent recurrence.
- Test any coating on a hidden area before full application.
In all cases, plan the project and measure your progress against your desired finish to avoid over-processing the metal.
Safety, disposal, and environmental considerations (revisited)
Reiterating safety, never mix rust removers with other cleaners unless instructed. Never use metal-damaging techniques on antique or highly delicate items. Always dispose of waste materials according to local regulations and reuse or recycle where possible. Corrosion Expert emphasizes responsible handling to protect you and the environment while achieving durable results.
Tools & Materials
- Protective gloves (nitrile or latex)(Chemical resistance and cut protection; choose size that fits well)
- Safety goggles or face shield(Shield against rust particles and chemical splashes)
- Respirator or dust mask(P2 or N95 equivalent for dusty work or chemical fumes)
- Drop cloth or plastic sheeting(Protect surfaces from dust and spills)
- Wire brush (nylon and brass)(Start with nylon; brass when heavy rust is present)
- Sandpaper (60-120 grit, up to 400 for finishing)(Progress to finer grits for a smoother finish)
- Abrasive wheel or orbital sander (optional)(Use cautiously on flat surfaces; avoid thin areas)
- Rust remover chemical (phosphoric acid-based or chelating agent)(Follow label directions; apply with brushes or pads)
- White vinegar or citric acid (natural method option)(Natural rust removal alternatives; suitable for light rust)
- Baking soda and water (neutralizer/flush)(Use to neutralize acids after treatment)
- Clean rags and bucket for rinsing(Have plenty of absorbent cloths for drying and cleanup)
- Mineral spirits or water for cleaning(Clean residue; water is preferred for safety)
Steps
Estimated time: 60-120 minutes
- 1
Inspect and assess rust
Begin by inspecting the item to determine rust depth, finish integrity, and whether the metal is structurally sound. Photograph problem areas for progress tracking and to guide your removal method. Decide if you will preserve any plating or coatings or if full removal is required.
Tip: Document initial condition with photos and notes to compare after finishing. - 2
Choose your rust removal method
Based on the assessment, select mechanical, chemical, or natural methods. For superficial rust, mechanical methods are often enough; for heavier rust, consider chemical or chelating agents. Always test on a hidden area first.
Tip: When in doubt, start with the least aggressive method to minimize risk. - 3
Prepare workspace and safety gear
Set up a well-ventilated area with a protective surface. Put on gloves, goggles, and a mask; cover nearby floors and items. Have a clean rinse station ready to remove residues.
Tip: Ventilation is crucial when using chemical rust removers or strong acids. - 4
Mechanical rust removal
Use a nylon brush to loosen surface rust, then switch to brass or steel brushes for stubborn areas. Progress through sandpaper grits to smooth the surface. Avoid excessive grinding on thin or delicate parts.
Tip: Work in small sections and periodically wipe away debris to see progress. - 5
Chemical rust removal (if needed)
Apply rust remover per label directions; maintain dwell times and avoid overexposure. Rinse thoroughly with clean water after treatment. Neutralize acidic residues if the product calls for it.
Tip: Never mix chemical products unless explicitly instructed by the manufacturer. - 6
Natural method approach (optional)
If using vinegar or citric acid, soak or apply locally and allow extended dwell time. Rinse, scrub gently, and dry completely. This approach is gentler but slower for heavier rust.
Tip: Test sensitivity on delicate finishes before wide application. - 7
Dry, inspect, and neutralize
Dry the metal completely and inspect the surface for remaining rust. Neutralize acidic residues with a baking soda solution if required by the method used, then rinse again and dry.
Tip: Drying prevents flash rust before coating. - 8
Protect and finish
Apply a protective coating, such as primer or paint suitable for metal, or a rust inhibitor oil for tools. Reinstall or store the item in a dry environment to delay future corrosion.
Tip: Choose a coating compatible with the metal type to avoid compatibility issues.
Quick Answers
What is the best method for light surface rust?
For light surface rust, start with mechanical methods like brushing and light sanding. If needed, a natural approach such as vinegar can help, but test first. Avoid harsh chemicals on delicate finishes.
For light rust, begin with brushing and sanding; test any natural method first, and escalate only if needed.
Can rust be completely removed from pitted metal?
Pitting can prevent complete restoration of structural strength. You can stabilize the metal and treat remaining rust, but consider reinforcement or replacement for critical parts.
If rust has pitted the metal, full restoration may not be possible; stabilization is often the best option.
Is it safe to use household vinegar for rust removal?
Vinegar can remove light rust but works slowly and is less effective on heavy rust. It’s a cheap option for small, non-structural items.
Vinegar can help with light rust, but don’t rely on it for heavy corrosion.
Should I seal metal after rust removal?
Yes. Apply a rust-inhibiting primer or protective coating to prevent moisture ingress and future rust. For tools, a light oil coating can be protective.
After removing rust, sealing or coating is essential to prevent recurrence.
What safety precautions should I follow?
Wear PPE, work in a well-ventilated area, and dispose of waste according to local rules. Keep children away from the workspace.
Always wear PPE and ventilate; follow disposal guidelines.
Can I use a drill with a metal brush on all items?
Only on sturdy, non-delicate items. Delicate finishes can be gouged or warped by power tools. Use hand tools where possible on fragile pieces.
Be careful with power tools on delicate surfaces.
Watch Video
Quick Summary
- Assess rust depth before choosing a method
- Mechanical methods preserve finishes best on light rust
- Chemical methods require careful handling and neutralization
- Seal and protect metal after rust removal to prevent recurrence